Guide to operating SEACAS2023 Hackathon Notebook Offline
Clarification: In order to run the SEACAS2023 Hackathon Notebook Offline, you must run it once while online in order to download the dependencies of the notebook. After that, you may skip all parts that try to access apt-get or curl as those need internet.
First, make a new directory in your computer as your workspace. I recommend the name seacas2023
Next, download the SEACAS2023 Hackathon notebook by going to File > Download > .ipynb from inside the notebook and save it to this folder.
To run the .ipynb from your computer, you will need an Ubuntu environment.
For Ubuntu
For Ubuntu systems, Jupyter Notebook should work as intended
Installing Jupyter
From your Ubuntu terminal, run the following command
sudo apt-get install jupyter
Once that is done, you will have the Jupyter notebook program in your PC.
Running the notebook
Change your directory to the workspace you created earlier. For me, it is /home/lawrence/seacas2023
Finally, run the following command:
jupyter notebook SEACAS_2023.ipynb
This should automatically open a browser containing the notebook. Run it as you would the colab notebook.
For Windows
WSL2 Installation
WSL stands for Windows Subsystem for Linux. It runs Ubuntu inside Windows so that you are able to run Linux commands.
Detailed installation instructions can be found here in the Microsoft website. For a quickstart, run the following command in your command prompt.
wsl --install
To make sure that your WSL is WSL2, run the following command:
wsl --set-version Ubuntu 2
After this, you can enter Ubuntu by typing wsl in your command prompt.
Option 1: Jupyter Notebook
To install Jupyter notebook, simply do
sudo apt-get update
sudo apt-get install jupyter
and then run
jupyter notebook SEACAS_2023.ipynb
Option 2: VSCode Jupyter Extension
For WSL systems, Jupyter Notebook may not easily run without bugs. You may browse the internet for clues as how to make it work, if you want (I made it work by downgrading/updating a few other packages).
My preferred way is to use VSCode's Jupyter extension instead.
Installing VSCode with WSL2 & Jupyter Extensions
First, download VScode and open it.
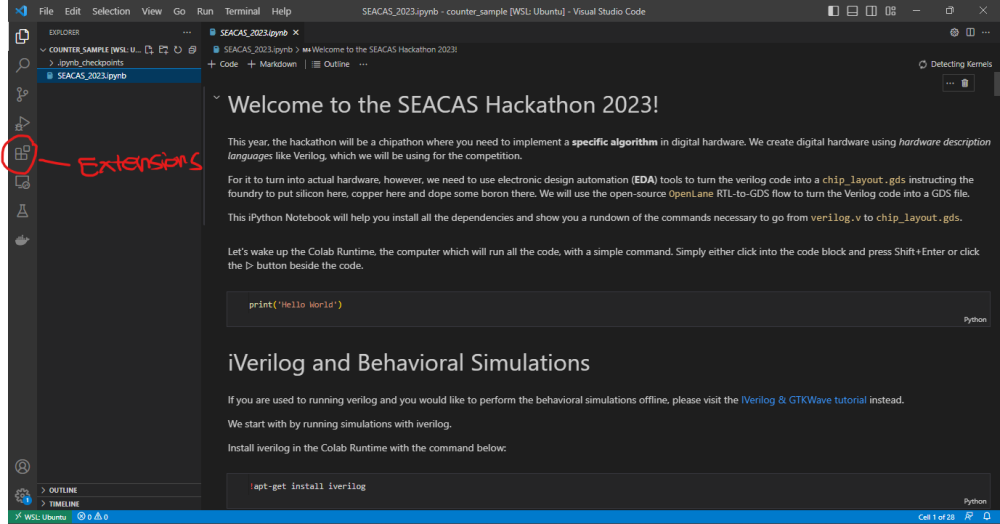
On the left side bar, you will see a button for "Extensions" which should be a 4-block icon. Alternatively, you can open it with CTRL + SHIFT + X.
Search for the Remote Development extension and install it. Next, search for the Jupyter extension and install it.
Running the notebook inside VSCode
Open a new command prompt window and type WSL to enter Ubuntu terminal.
From Ubuntu, navigate to the workspace you created earlier. For me, it is in /mnt/c/Users/Lawrence/seacas2023. Your C folder is in /mnt from inside WSL.
Open this folder in VScode by typing code . inside the terminal.
The window should look like the picture provided.
Finally, open the ipynb file from inside VScode and run it as you would from Colab.
Note for Performance
In order to make things run faster, I recommend transferring the workspace to a folder inside the WSL2 folders (not /mnt/c).
To transfer files into WSL2, you may simply open Linux from inside your file explorer sidebar (by clicking the penguin icon on the sidebar containing This PC, Network, Linux).
Alternatively, you can navigate into this by putting \\wsl$ on the address bar of explorer.
